Ambient Occlusion for SketchUp is a tool that’s got users rather excited.
Ambient Occlusion, first introduced natively in SketchUp 2024, adds shadows and detail to edges with just one click.
What is Ambient Occlusion for SketchUp?
Scientifically speaking, ambient occlusion is the idea that less light will find its way into the nooks, creases, recesses and gaps. In SketchUp, the Ambient Occlusion functionality adds shadows at the point where faces meet inwardly. For example, around the lower parts of the faces, in corners and between close objects. This setting can add an interesting visual detail to 2D and 3D images, which can go a long way when presenting ideas to a client.
Interestingly, it’s a real-time rendering option, which means you can leave the option toggled on while you work. This can be particularly helpful when building complicated items, as it gives an extra aspect of definition. It is also beneficial when deciding on light angles and making final edits.
Ambient Occlusion is compatible with all SketchUp materials and rendering types, including the PBR materials released in SketchUp 2025.
How to use it?
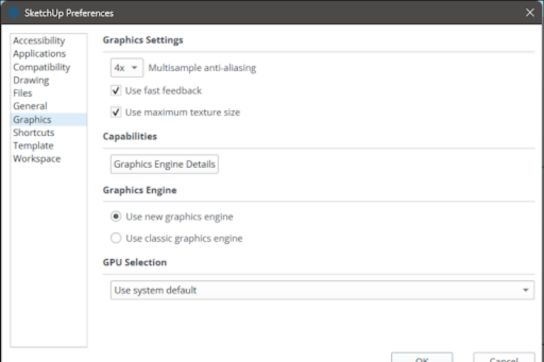
First, you need to turn on the new SketchUp graphics engine. To do this, you’ll need to go to the Preferences menu, select graphics, and then select “Use new graphics engine.”
To access the Ambient Occlusion tickbox, go to the menu and click View > Face Style > Ambient Occlusion.
Alternatively:
- Open up the styles panel
- Click on “Faces”
- Tick the Ambient Occlusion box
Once Ambient Occlusion is ticked, you will see two sliders.
- Distance: how far the shadow reaches from the edges
- Intensity: Makes the shadows darker or lighter
The distance and intensity are relative to the size of the world. So, if you scale objects up and down, the shadows will not scale with the model. Huge objects will have tiny shadows, and tiny objects will have huge shadows.
These sliders can help you control the shadows and get the desired look.
Preset Styles
While you can use Ambient Occlusion on any surface, SketchUp has prepackaged some pre-made textures.
These presets include:
Coloured Clay: For massing and clay modelling. This allows you to build in one or two colours with subtle occlusion as default. It’s perfect for presenting initial models when simplicity is important, but you want to clarify the details.
Dark Pen: Dark pen strokes with slight extensions. It is great for giving a shaded pen drawing with a secondary colour to pick out details. This setting also removes the sky from the scene.
Details: This renders the scene in a simple line-drawn state, which is excellent for things like first drafts, elevation sketches, or instruction manuals.
Exterior: Shaded with texture with ground plane and horizon. As the name suggests, it is meant to show the outside of buildings, and it has a light and airy feel to the shading.
Interior: This is used for interiors with natural and artificial lighting. The default shading is more intense than the Exterior preset and seems to be designed for rooms with low levels of natural light. The intensity and distance may need to be reduced for scenes with lots of light.
Pencil and paper: sketchy strokes imitating a pencil drawing. Great for stylised designs or for showing first drafts to clients.
Strained Sketch: Sketch with intense occlusion. A more extreme version of the paper and pencil sketch.
These pre-made textures give you a starting point for your work. Using the edit tab, you can still change the colours, edit the Ambient Occlusion settings, add textures, and more to get the desired results.
Ambient Occlusion Vs Shadows
While Ambient Occlusion does give a shadow-like finish, it is more of a shading tool. The shadows are not relative to your light source.
SketchUp’s shadow tools are more about light positioning. The shadow tool will give excellent light-dependent shadows but might not pick out the shadow between tiles on a roof or the corners of a room, for example.
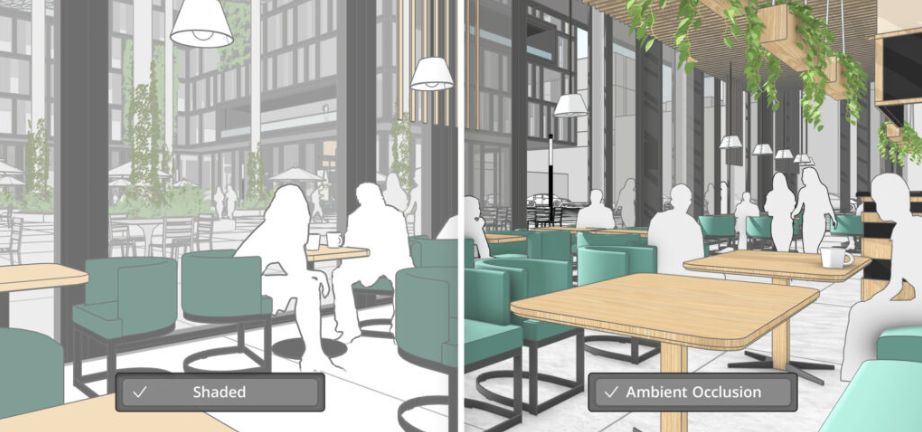
In the picture below, you can see the difference between the standard SketchUp shader and Ambient Occlusion. The shadows between the wooden roof details and the chairs really highlight what Ambient Occlusion can do.

Ambient Occlusion works with the shadow tool to give a little more detail and depth, especially around more detailed areas or sketch-style presets.
We recommend trying shadows and ambient occlusion together to see what result you get.
Exporting Ambient Occlusion
You can also download the Ambient Occlusion as a second pass and combine it with an image in 2D software, such as Photoshop. Set your Ambient Occlusion settings and then download the image as a .png with a transparent background. These can then be opened in Photoshop or other image-editing software. You can use this when making 2D images for marketing material, client pitches, instruction manuals, and more.
Conclusion
Overall, we really like SketchUp’s Ambient Occlusion feature. It’s a quick and convenient way to improve visual presentations. While there are still a few bugs, such as the rendering on cylinders isn’t quite there yet, we do think this will quickly become part of our workflow.
Check out Ambient Occlusion yourself with a 7-day free trial of SketchUp Pro. Or buy SketchUp on CAD Software Direct.